Существуют различные способы распознавания речи на основе платы Arduino, к примеру, ранее на нашем сайте мы рассматривали аналогичный проект на основе платы Arduino Nano 33 BLE Sense и Edge Impulse Studio. Но в данной статье мы рассмотрим, пожалуй, самый простой способ распознавания речи с помощью платы Arduino Uno. Дополнительным достоинством описанного здесь способа является то, что для распознавания речи не используется доступ к сети Интернет как во многих аналогичных проектах – здесь распознавание речи полностью выполняется с помощью локального компьютера, не обращаясь к ресурсам глобальной сети.
 Принцип распознавания речи в этом проекте основан на использовании библиотеки распознавания языка c# под названием system.speech. Строго говоря, плата Arduino не участвует в данном проекте в процессе распознавания речи, оно выполняется на локальном компьютере, но зато есть возможность с помощью голосовых команд управлять устройствами, подключенными к плате Arduino. Проект может быть использован в различных системах автоматизации дома.
В целях упрощения проекта мы в нем с помощью голосовых команд будем включать/выключать светодиоды, но однако вы можете изменить его по своему желанию и реализовать управление практически любыми устройствами, которыми можно управлять с помощью платы Arduino.
Автор проекта (ссылка на оригинал приведена в конце статьи) хотел реализовать распознавание речи на основе платы Arduino без использования какого либо внешнего модуля, реализующего функции распознавания речи. И при создании данного проекта он был вдохновлен идеей, реализованной в этой статье - https://www.c-sharpcorner.com/article/turning-led-off-and-on-through-voice-recognition/.
Необходимые компоненты
Аппаратное обеспечение
- Плата Arduino Uno (купить на AliExpress).
- Резистор 1 кОм (3 шт.) (купить на AliExpress).
- Светодиод (3 шт.) (купить на AliExpress).
- Наушники с микрофоном (можно использовать встроенный в компьютер/ноутбук микрофон если он там есть).
- Макетная плата.
- Соединительные провода.
Программное обеспечение
- Arduino IDE.
- Microsoft Visual Studio 2015.
Схема проекта
Схема проекта для распознавания речи на основе платы Arduino Uno представлена на следующем рисунке.
 После сборки схемы проекта подключите вашу плату Arduino к компьютеру с помощью USB кабеля и загрузите в нее код скетча, приведенный в конце данной статьи.
Написание кода программы
Для реализации этого проекта вам необходимо установить на свой компьютер программу Microsoft Visual Studio. Автор проекта использовал Microsoft Visual Studio 2010, однако вы можете установить любую другую версию данной программы, только убедитесь в том, что из нее вы сможете создавать формы windows используя приложение c#. Скачать Microsoft Visual Studio вы можете по следующей ссылке.
 После того как вы загрузите скетч нашего проекта в плату Arduino запустите в Microsoft Visual Studio приложение c# при помощи нажатия иконки с зеленой стрелкой как показано на следующем рисунке.
 Примечание 1: данный проект не будет работать если вы не подключите библиотеку using.system.speech в код c# в visual studio. Для этого в visual studio выберите пункт меню Project->Add Reference->.Net, в открывшемся окне найдите библиотеку system.speech, выберите ее и нажмите кнопку OK.
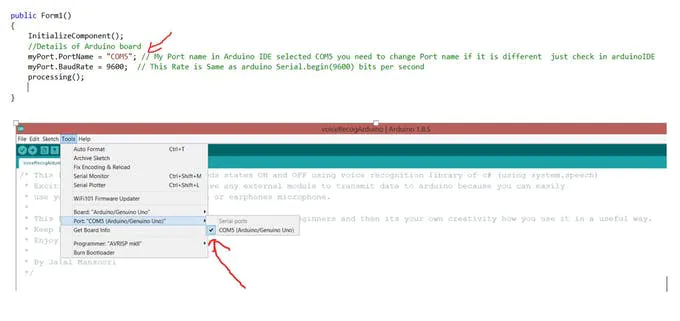
 Примечание 2. Убедитесь в том, что COM порт, который вы выбрали в Arduino IDE, тот же самый, что и в коде c# в visual studio. У автора проекта это порт COM5 – он одинаков у него в обоих кодах.
 Исходные коды программ
Скетч для Arduino
|
1 2 3 4 5 6 7 8 9 10 11 12 13 14 15 16 17 18 19 20 21 22 23 24 25 26 27 28 29 30 31 32 33 34 35 36 37 38 39 40 41 42 43 44 45 46 47 48 49 50 51 52 53 54 55 56 57 58 59 60 61 62 63 64 65 66 67 68 69 70 71 72 73 74 75 76 77 78 79 80 81 82 |
/* This Program is about controlling leds states ON and OFF using voice recognition library of c# (using system.speech) * Exciting Part is you dont need to have any external module to transmit data to arduino because you can easily * use your builtin computer microphone or earphones microphone. * * This Program is just to give basic idea specially to beginners and then its your own creativity how you use it in a useful way. * Keep Learning, Share, think and Repeat * Enjoy ! * * By Jalal Mansoori */ const int blueLed=10; const int redLed=9; const int greenLed=8; char incomingData='0'; void setup() { // put your setup code here, to run once: //getting leds ready Serial.begin(9600); pinMode(blueLed, OUTPUT); pinMode(redLed, OUTPUT); pinMode(greenLed, OUTPUT); } void loop() { // put your main code here, to run repeatedly: incomingData=Serial.read(); // Switch case for controlling led in our case we have only 3 Blue, Green and Red switch(incomingData) { //These cases are only for state ON of led (условия для состояния ON светодиодов) // For blue led case 'B': digitalWrite(blueLed, HIGH); break; // For red led case 'R': digitalWrite(redLed, HIGH); break; // For green led case 'G': digitalWrite(greenLed, HIGH); break; //These cases are for state OFF of led and case name z , x, c are just randomly given you can also change but (условия для состояния OFF светодиодов) // make sure you change it in a c# code as well. // For blue led case 'Z': digitalWrite(blueLed, LOW); break; // For red led case 'X': digitalWrite(redLed, LOW); break; // For green led case 'C': digitalWrite(greenLed, LOW); break; //For turning ON all leds at once :) (включение всех светодиодов) case 'V': digitalWrite(blueLed, HIGH); digitalWrite(redLed, HIGH); digitalWrite(greenLed, HIGH); break; //For turning OFF all leds at once :) (выключение всех светодиодов) case 'M': digitalWrite(blueLed, LOW); digitalWrite(redLed, LOW); digitalWrite(greenLed, LOW); break; } } |
Код C#
|
1 2 3 4 5 6 7 8 9 10 11 12 13 14 15 16 17 18 19 20 21 22 23 24 25 26 27 28 29 30 31 32 33 34 35 36 37 38 39 40 41 42 43 44 45 46 47 48 49 50 51 52 53 54 55 56 57 58 59 60 61 62 63 64 65 66 67 68 69 70 71 72 73 74 75 76 77 78 79 80 81 82 83 84 85 86 87 88 89 90 91 92 93 94 95 96 97 98 99 100 101 102 103 104 105 106 107 108 109 110 111 112 113 114 115 116 117 118 119 120 121 122 123 124 125 126 127 128 129 130 131 132 133 |
/* This Program is to connect c# and Arduino to transmit data from computer microphone to arduino board (эта программа соединяет c# и плату Arduino чтобы передавать данные от микрофона, подключенного к компьютеру, на плату Arduino By Jalal Mansoori */ using System; using System.Windows.Forms; using System.IO.Ports; // This library is for connecting c# and Arduino to transmit and receive data through ports (библиотека для организациии взаимодействия между c# и Arduino) //Below are libraries for voice recognition (библиотеки для распознавания речи) using System.Speech; using System.Speech.Recognition; using System.Speech.Synthesis; namespace CsharpCode { public partial class Form1 : Form { //Creating objects (создание объектов) SerialPort myPort = new SerialPort(); SpeechRecognitionEngine re = new SpeechRecognitionEngine(); SpeechSynthesizer ss = new SpeechSynthesizer(); // When you want program to talk back to you Choices commands = new Choices(); // This is an important class as name suggest we will store our commands in this object (мы будем хранить наши команды в этом объекте) public Form1() { InitializeComponent(); //Details of Arduino board myPort.PortName = "COM5"; // My Port name in Arduino IDE selected COM5 you need to change Port name if it is different just check in arduinoIDE (использован COM5, измените его если у вас другой COM порт) myPort.BaudRate = 9600; // This Rate is Same as arduino Serial.begin(9600) bits per second (скорость передачи такая же как и в arduino) processing(); } // Defined Function processing where main instruction will be executed ! (основная функция программы) void processing() { //First of all storing commands commands.Add(new string[] { "Blue On", "Red On", "Green On", "Blue Off", "Red Off", "Green Off", "Exit", "All On", "All Off","Arduino Say Good Bye to makers" }); //Now we will create object of Grammer in which we will pass commands as parameter (создаем объект Grammer, в который мы будем передавать команды как параметры) Grammar gr = new Grammar(new GrammarBuilder(commands)); // For more information about below funtions refer to site https://docs.microsoft.com/en-us/dotnet/api/system.speech.recognition?view=netframework-4.7.2 re.RequestRecognizerUpdate(); // Pause Speech Recognition Engine before loading commands (пауза в движке распознавания речи перед загрузкой новых команд) re.LoadGrammarAsync(gr); re.SetInputToDefaultAudioDevice();// As Name suggest input device builtin microphone or you can also connect earphone etc... re.SpeechRecognized += new EventHandler<SpeechRecognizedEventArgs>(re_SpeechRecognized); } void re_SpeechRecognized(object sender, SpeechRecognizedEventArgs e) { switch(e.Result.Text) { ////For Led State ON // For blue led case "Blue On": sendDataToArduino('B'); break; // For red led case "Red On": sendDataToArduino('R'); break; // For green led case "Green On": sendDataToArduino('G'); break; //For Led State OFF // For blue led case "Blue Off": sendDataToArduino('Z'); break; // For red led case "Red Off": sendDataToArduino('X'); break; // For green led case "Green Off": sendDataToArduino('C'); break; //For turning ON all leds at once :) case "All On": sendDataToArduino('V'); break; //For turning OFF all leds at once :) case "All Off": sendDataToArduino('M'); break; //Program will talk back case "Arduino Say Good Bye to makers": ss.SpeakAsync("Good Bye Makers"); // speech synthesis object is used for this purpose (используется объект для синтеза речи) break; // To Exit Program using Voice :) (выход из программы по голосовой команде) case "Exit": Application.Exit(); break; } txtCommands.Text += e.Result.Text.ToString() + Environment.NewLine;// Whenever we command arduino text will append and shown in textbox (когда мы подаем команду arduino она отображается в виде текста в текстовом поле) } void sendDataToArduino(char character) { myPort.Open(); myPort.Write(character.ToString()); myPort.Close(); } private void btnStop_Click(object sender, EventArgs e) { re.RecognizeAsyncStop(); //btnStart.Enabled = true; btnStop.Enabled = false; btnStart.Enabled = true; } private void btnStart_Click(object sender, EventArgs e) { re.RecognizeAsync(RecognizeMode.Multiple); btnStop.Enabled = true; btnStart.Enabled = false; MessageBox.Show("Voice Recognition Started !", "Information", MessageBoxButtons.OK, MessageBoxIcon.Information); } } } |


